Showing posts with label recipe. Show all posts

Monday, August 31, 2015

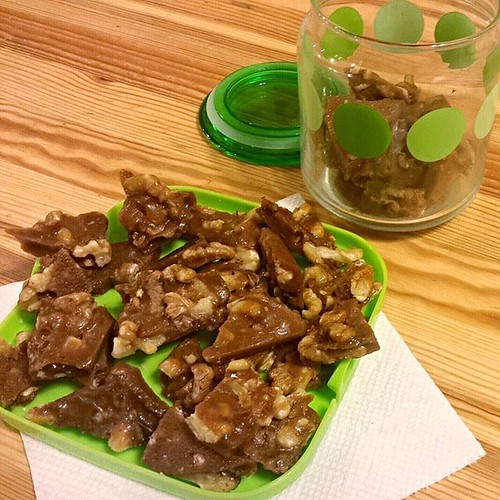
Recipe: Maple Nut Toffee

I don't fancy myself as much of a confectioner, considering how anxious I get over exact measurements and a big role of candymaking is boiling the syrup the right temperature.
Maple Nut Toffee / Brittle
So I was rather surprised at how this easy and delicious maple nut toffee turned out, since the recipe is fairly forgiving. Instead of a thermometer (which I don't have), I used the cold water candy test. And it's a lot less stressful than one (including myself) imagine. Just plunge a small spoon's worth of syrup into cold water and use your hand to see what stage the resulting candy is.

Maple Nut Toffee / Brittle
(adapted from California Walnuts' website)
about 50-60 bite-sized pieces

Ingredients:
2 cups of raw, unsalted nuts, roughly chopped (I prefer walnuts, pecans or cashews since their softer crunch is a nice contrast against the snap of the toffee)
1/2 cup granulated white sugar
1/2 cup light brown sugar
1/4 cup grade B maple syrup*
1 cup (2 sticks) of unsalted butter, cut into smallish pieces (for faster melting)
2 teaspoons vanilla extract
1/4 cup water
extra cold water for candy testing

*the grades of maple syrup is not about quality, but whether its color (& by association, "mapliness") — for cooking I prefer Grade B since it allows that distinctive busky, woodsy flavor to shine through.

Directions:
1. In a non-stick pan over medium-high heat, heat the chopped nuts, stirring/tossing regularly. Once it starts getting toasty (you'll start smelling the nutty aromas, and the nuts will start to char around the edges), turn off heat and set aside.
2. In a stainless steel pan, combine all the other ingredients and bring to low, gentle boil over medium-high heat, stirring as needed to melt the butter and mix everything together into a syrup.
3. Once the mixture starts to boil, lower heat as needed to bring it to a simmer and allow it to heat for another 15-20 minutes. Do not stir during this time.
4. When the candy color is a medium brown, do a cold water candy test. When it hits the hard crack stage (or when it hits 300 degrees Fahrenheit — if you have a cooking thermometer), turn the heat off and remove the pan from the burner. (Per the linked page, be careful when working with the hot candy syrup)
5. Add the toasted nuts into the syrup and stir to evenly incorporate the two.
6. Pour the mixture into a baking pan (I used a 8"x12") and spread evenly to cover all edges & corners. You can use a larger pan for a thinner layer candy, making it more of a brittle than a toffee.
7. Set and allow to cool for a few hours (or overnight) at room temperature.
8. Break the sheet of toffee into bite-sized pieces to store and enjoy!

Friday, May 22, 2015

Friday Nights & Caramelized Onions . . .

Whereas my friends and colleagues are planning dates, get-togethers or a headstart on a roadtrip (especially for this long weekend,) Friday nights for me mean busywork in the kitchen. Sometimes it could be batching up flavored syrups for cocktails & sodas. Or eke out a weekend dish from whatever leftovers I've stashed up throughout the week.

Or, more likely, spend the better part of an hour caramelizing onions to jar up & have on the ready for the next week or so.
I agree with Tom Scocca that there are simply no legit cooking shortcuts around caramelizing onions. It simply takes time and patience. (Yes, there's the "set it and forget it" slow cooker method too - but I always found the flavor & texture results subpar to the pan version, plus there's the room full of acrid rawish onion smell during the early stages of this method.)

However, one preparation shortcut I will take is buying pre-diced onions at the market, given my affinity for crying out a river whenever I have to cut them myself. I agree it doesn't have visual or tactile appeal of the long curls, but it's a compromise I can live with. And hey, these remind me of the grilled onions at In 'n Out!

Also — caramelized onions purists will balk at this — I do add a splash of maple syrup at the end of the process too. Not that the onions needed any additional sweetening after all that time caramelizing, but the syrup does give it a welcoming warm & woodsy depth. Oh, and a splash of balsamic or sherry vinegar to balance out the extra sugar.

But rather than lament about the time wasted on caramelizing onions, I make the best of those 45 minutes. I put on a lengthy podcast, pour a glass of wine or beer and flip through some magazines, with the occasional stir to reassure the onions that, "Yes, I'm here until you turn into burnished, brown morsels of deliciousness."

And that's more satisfying than any Friday night outing in a chaotic & crowded restaurant/bar/club can ever do.

Maple-Balsamic Caramelized Onions
Makes 12 oz of caramelized onions
Prep Time: Approx. 45 minutes

Ingredients:
24 oz. diced white onions (or approximately 3 medium onions diced)
2 tablespoons extra virgin olive oil
1/2 teaspoon salt
1 tablespoon maple syrup
2 teaspoons balsamic vinegar
water

Directions:
1. Pour oil in a large skillet over medium heat, once it gets hot enough (the oil starts getting runny), add onions and salt. Stir until the onions and thoroughly coated in oil. Lower heat to medium.
2. Stir the onions occasionally (once ever 3-5 minutes) to distribute heat and prevent bottom layer from burning. If it looks too dry, add a splash or two of water.
3. In the meantime, relax! Enjoy a glass of beer/wine. Put on some music or a podcast. Get some leisure reading on.
4. About 40 minutes in, the onions should be a medium to dark brown. Stir in the maple syrup and balsamic vinegar. Taste and adjust as needed (more syrup/balsamic/salt).
5. Use immediately or store for up to two weeks in a fridge (if it lasts that long!)


Monday, August 25, 2014

Recipe: Peachy-Basil Sangria

Summer may be rolling to a (too fast) end, but there's still Labor Day weekend & plenty of warm days ahead.
Peachy-Basil Sangria
And per my summer potluck/party tradition, that also means it's sangria time! And this year's version might be my favorite yet, since it goes down so easy but has a few touches to keep the flavors interesting. On top of lusciously sweet & fragrant peaches, I've also added a hearty helping of refreshing aromatic basil and a pinch of sweet spices. Then the batched syrup is spiked with a nice slug of gold rum and ready to be combined with some crisp white wine & served when needed.

Peachy-Basil Sangria (for 2 pitchers' worth, approx. 10 to 16 servings)

Ingredients:

3 ripe medium peaches, peeled, pitted and sliced (alternatively, a 12 oz. bag of frozen peaches)
2 cups water
1 cup sugar
1 handful of fresh sweet basil leaves, plus additional for garnish
1 teaspoon ground cinnamon
1/2 teaspoon freshly grated or ground nutmeg
3/4 cup gold rum (I used Mount Gay Eclipse)
2 bottles of light and crisp white wine (I used Flip Flop's pinot grigio)
Ice cubes
1 medium ripe nectarine, for garnish (optional - and I only opted for the nectarine because I don't care for peaches' fuzzy skin)
Virgin option: Omit the rum, swap white wine for dry ginger ale.

Directions:

1. In a medium saucepan, combine water, peaches, sugar, cinnamon and nutmeg. Bring to a gentle boil, then reduce heat and let it simmer uncovered for 15 minutes. Allow it cool on stovetop for 10 minutes afterwards.
2. Place the mixture in a blender along with the fresh basil leaves, then pulse blend until the leaves are pulverized and incorporated. Then add rum to the mixture. The color/appearance will be a bit unseemly but this will improve when combined with the wine. (This mixture can also be stored up to three days in a fridge.)
3. In a pitcher, combine the wine & syrup in a 2:1 ratio and give it a quick stir, garnish with additional basil leaves and nectarine slices. Serve over ice.

Monday, March 31, 2014

Recipe: Express Tiramisu

Back in the mid-late 90s, tiramisu was the "it" dessert. And thus, it was something I consistently order every time I see it on the menu, all the while feeling very sophisticated about the layers of cake & custard, with a hit of coffee and sometimes a splash of booze.

And even though this dessert has already seen its heyday, it's still something I whip up regularly for gatherings. Just saying that you're bringing tiramisu to a party lends a whole sense of "Ooo la la," even though it's impeccably easy to make. Moreso given the time- & effort-saving shortcuts I take, which means it's really a little prep work (namely, brewing then cooling down some coffee), half an hour for mixing & assembly and then a few hours' (or overnight) in the fridge before serving.

Express Tiramisu (serves 6-8)

Ingredients:

  • 18 ladyfinger cakes (readily available at Italian markets)
  • One 8 oz. package of cream cheese, softened
  • 4 oz. ricotta cheese
  • 4 oz. heavy whipping cream
  • 1 cup granulated sugar, divided in half
  • 1 tablespoon vanilla extract
  • 1.5 cup espresso or strongly-brewed coffee, cooled to room temperature
  • 2 oz. simple syrup (1:1 sugar-water mix)
  • 3 oz. Amaretto, or your liqueur of choice (optional)
  • Chocolate shavings for garnish (I used a vegetable peeler on a bar of dark chocolate)
Directions:
  1. In a shallow pan or dish, combine coffee, simple syrup and Amaretto, set aside.
  2. In a separate bowl, combine cream cheese, ricotta cheese, half cup of sugar and vanilla extract; mix until smooth
  3. By hand or machine, whisk together half cup of sugar with the heavy whipping cream until it has soft-to-medium peaks. Then gently fold into the cream & ricotta cheese mixture.
  4. Dip ladyfingers, one at a time, into the coffee mixture - gently rolling both sides until they start to soften, then place in a 8" x 8" dish or pan. Repeat until you have one layer of coffee-soaked ladyfingers in the dish (feel free to break apart the cakes as needed to fill any big gaps or holes.)
  5. Use a spatula or wooden spoon to spread a thin layer of the cheese mixture until the ladyfingers are no longer visible.
  6. Repeat with another layer of soaked ladyfingers & cheese mixture. 
  7. Top with chocolate shavings, cover with plastic wrap and chill in fridge for at least 3 hours (or overnight). Serve chilled.

Friday, February 21, 2014

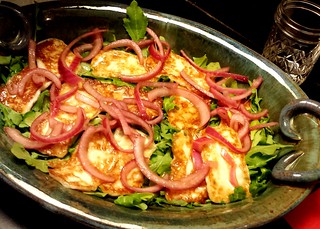
Recipe: Grilled Halloumi w Pickled Onion

Grilled Halloumi w Pickled Onions & Arugula 
This is one of my standby appetizers when I'm going to a potluck or hosting a party. It's vibrantly colorful with translucent, jewel-like red onions set against bronzed slabs of halloumi and a bed of fresh greens and more importantly for gatherings—this crowd pleaser is a cinch to make, so you can actually enjoy the party too rather than slave away in the kitchen.

Simply give the onions a quick chop & pickling an hour prior, then pan fry some halloumi on a pan just prior to serving. Then voila, a plate of oozy, salty cheese (which is what I love about halloumi, its high melting point means you can get a crispy char on the outside while it retains a softened, almost but not quite melted texture within) whose richness is cut with acidic onions and peppery arugula.

In hindsight, I kinda feel guilty even calling this a "recipe", but the results are definitely splendid.

Grilled Halloumi with Pickled Onion

Ingredients (serves approx. 8)
14 oz. Halloumi cheese, sliced into quarter-inch slabs
1 small red onion, cut in half vertically, then thinly sliced so you get semi-circles out of the rings
4 oz. red wine vinegar
1 oz. water
1 teaspoon sugar
2 cups arugula, washed & dried (or your leafy greens of choice)
vegetable oil

Directions:
1. About an hour before serving, put the sliced onions in a bowl or a jar and add vinegar, water and sugar. Swish or shake occasionally, making sure all the slices have some time to immerse in the vinegar mixture.
2. 10 minutes before serving, heat up a skillet on medium-high heat for 30 seconds. While skillet is heating, put the arugula in a platter.
3. Add enough vegetable oil to coat the surface of the skillet, then put the cut slabs of halloumi cheese in.
4. In about a minute or two (when you see the edges of the cheese getting golden brown & bubbly), flip the halloumi and allow it to pan fry for another minute.
5. Put the halloumi on top of the arugula, then the pickled onion slices.
6. Pour half the pickling brine onto the skillet to deglaze, then drizzle over platter and serve.

Friday, December 13, 2013

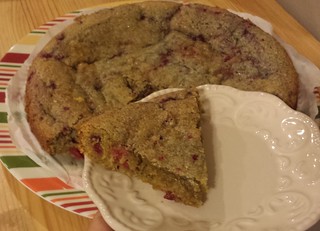
Recipe: Lemon-Raspberry Sour Cream Cake

For me, chilly winter weather (OK, as chilly as Southern California gets) means time to fire up the oven so I can flood my home with that wondrous freshly-baked aromas & a blast of comforting warmth.

All this was made even better when I entered Hodgson Mill's "Have a Grain Holiday" recipe contest, since I get to be creative in crafting a recipe and get a batch of their lovely baking products too. (Actually, you can get a chance at their baked goods too by entering their sweepstakes, and if you missed out on that - here's a $1 off coupon for you to use through the end of Feb.)

And for my blog readers, here's an extra giveaway opportunity for their baking products.

Lemon-Raspberry Sour Cream Cake And while I know winter usually call for baked goods that are hearty, robust and spicy (fruitcakes, gingerbreads and the like,) I think it's a refreshing change of pace to have some bright and sunny too -- thus my lemon-raspberry sour cream cake. It's light in texture, tender in mouthfeel with the mildest crunch from a sugar topping, and the perfect fruity tang to balance its sweetness.

Slices of this cake can pass off as a breakfast pastry. Or if you're feeling more indulgent, top it with a fruity dessert sauce, light frosting or scoop of sorbet for a simple yet elegant dessert dish.

Lemon-Raspberry Sour Cream Cake

Ingredients
  • 1 cup flour (I used Hodgson Mill's White Whole Wheat Flour)
  • 1 teaspoon baking powder
  • 1/2 teaspoon baking soda
  • 1/4 teaspoon salt
  • 1 stick unsalted butter, softened
  • 3/4 cup granulated sugar
  • zest of 2 lemons (approx. 2 tablespoons)
  • 1 egg, beaten
  • 1 teaspoon vanilla extract
  • 1/2 cup sour cream
  • 1 cup frozen raspberries
  • 1 tablespoon raw/turbinado sugar
  1. Preheat oven to 425 F and line the bottom of a 9 inch cake pan with parchment paper.
  2. In a bowl, whisk together flour, baking powder, baking soda and salt. Set aside.
  3. In a larger mixing bowl, toss the granulated sugar and lemon zest together; add butter then cream until smooth. (You can also use the butter paper to grease the sides of the cake tin.)
  4. Add sour cream, vanilla and egg and combine until smooth. Then add flour mixture in 2-4 batches, stirring until well-combined each time.
  5. Gently add the frozen raspberries and stir until they are well distributed throughout the batter.
  6. Pour batter into the cake pan and smooth out with a spatula or clean hands until it's even throughout (the batter is on the thicker side.)
  7. Sprinkle the turbinado sugar on top and put in oven's middle rack.
  8. Bake for 30 minutes, testing for doneness as needed (a toothpick inserted in center of cake should come out clean.)
  9. Let cool for 10-15 minutes, then serve. 
Disclosure: Hodgson Mill had provided the flour used in this recipe.

Tuesday, November 19, 2013

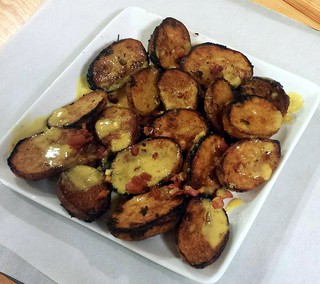
Recipe: Crispy Mustard-Herb Roasted Potatoes with Pancetta & Cider-Mustard Sauce

Mustard-Herb Roasted Potatoes w Pancetta & Cider-Mustard Sauce 
The recipe for this dish came about rather serendipitously . . . I had just read J. Kenji Lopez-Alt's (a.k.a. SeriousEats' Food Lab) tips & tricks for ultra-crispy oven-roasted potatoes and was waiting for an occasion to give it a try (as well as my own flavor twist to his recipe.) Around the same time, I got picked to participate in a Mystery Ingredient Blogger Showcase to craft a recipe using their secret ingredient, which turned out to be Colman's Mustard. So I basically blended the techniques of the former and the flavors of the latter for my Crispy Mustard-Herb Roasted Potatoes with Pancetta & Cider-Mustard Sauce.

The result from that marriage was nothing short of awesome. Thanks to the par-boil & high temperature roasting with generous—but not frightening—amounts of oil, the potatoes were amazingly crispy on the outside with a wonderfully creamy and fluffy interior. And the aromatic bite of the mustard (used in both powdered & paste forms) was an elegant balance to those baked taters, the cider cream sauce's rich, fruity sweetness and the smoky-salty bits of pancetta.

And like most of my other recipes, this one is a cinch to make. And because the potatoes stay crispy for a while (and is even delicious cold) you can make this show-stopper side ahead of time, just save the sauce for drizzling right before serving for that dramatic & flavorful finish.

Crispy Roasted Mustard-Herb Potatoes with Pancetta & Cider-Mustard Sauce

Ingredients:
  • 3 pounds baby potatoes, washed and cut in half lengthwise
  • 1 tablespoon rice vinegar
  • 1 tablespoon table salt
  • 1 teaspoon kosher salt 
  • 10 thyme sprigs
  • 7 tablespoons vegetable oil
  • 2 teaspoons Colman's mustard powder
  • 12 garlic cloves, peeled
  • 4 ounces diced pancetta
  • 4 ounces hard cider
  • 1 tablespoon Colman's prepared mustard
  • 2.5 ounces heavy whipping cream
  • 1 teaspoon cornstarch
  1. Preheat oven to 500 F; line a 8 x 12 sheet pan with aluminum foil and put it in the oven while it's preheating
  2. In a large enough saucepot, put potatoes in with enough water to cover it along with the table salt and rice vinegar. Bring it to boil over high heat, then turn the heat down to a simmer and let it simmer for 5-7 minutes (it should just start to yield when poked with a knife.
  3. While potatoes are simmering, combine the leaves from 5 thyme sprigs, kosher salt, mustard powder, and 3 tablespoons of vegetable oil in a large bowl and whisk with a fork until well blended.
  4. Drain the simmered potatoes, then toss them in the oil mixture until they are well coated; remove the heated sheet pan from the oven and generously coat with the remaining oil. Carefully lay the potatoes cut side down on the pan, and place in oven's middle rack to heat for 25 minutes.
  5. Remove from oven and turn the potatoes cut side up - carefully adding garlic cloves in the gaps between the potatoes. Put back in oven to heat for another 20-25 minutes (when the skin starts to char and the cut-side flesh is a deep golden brown.)
  6. While the potatoes are heating the 2nd time around, heat up the pancetta in a skillet on the stove at high heat. When it browns and crisps, remove them and set aside, leaving the rendered grease in the skillet.
  7. Turn heat to medium and pour in hard cider to deglaze, using a spatula or wooden spoon to scrape any pancetta bits stuck to the skillet.
  8. After the initial bubbles dissipate, add cream, English mustard, and cornstarch. Whisk vigorously, breaking up any lumps that may form.
  9. Let the sauce simmer for 1-2 minutes until it starts to thicken, then turn heat off and set aside.
  10. When the potatoes are ready, scoop onto a plate and sprinkle on the crisped pancetta; garnish with remaining thyme sprigs and drizzle on sauce just before serving.

Tuesday, November 5, 2013

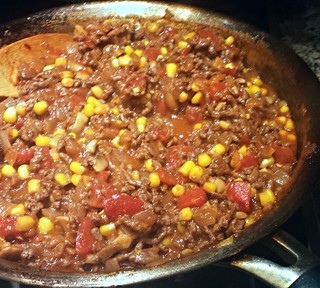
Recipe: California Ragù

Untitled
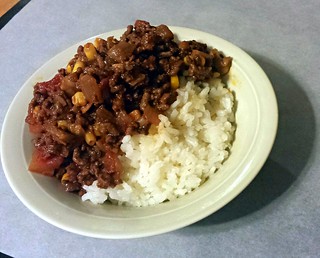
I know, corn is not a traditional meat ragù component (and I was already picturing throngs of Italian grandmothers screaming obscenities at me as I added it into the sauce,) but I personally love the color and flavor these golden nuggets of sweetness contribute, balancing the tomato's acidity, crushed chili flakes' heat and the earthy-savory combination of beef, onions and mushrooms. And to give it a good measure of sophistication, a healthy dose of Port to add some complexity to the whole affair without having to wait for it to reduce like one would with red wine.

I figured if I added California as an adjective to this dish, anything goes right? (Sorry if you came here thinking I'd add avocados to the recipe; I haven't... yet.)


Corniness aside (and you're free to omit them if you want to, but don't knock it till you've tried it), this is a supremely easy but deeply satisfying one-pan wonder, and perfect for those times when you want something comforting without wanting to put in a lot of effort. It takes under 45 minutes from start to finish, and most of that is just stirring & adding of ingredients. And I'd wager someone better at multi-tasking than I am can get this done in half an hour.
Untitled
My personal preference for eating this ragù is with rice, which soaks up the flavors beautifully while still retaining their fluffy texture. But feel free go traditional and use it to top some pasta, or even on its own with some shredded cheese on top and crusty bread on the side.

Wednesday, October 16, 2013

Recipe: Miso-Pesto Vegetable Soup

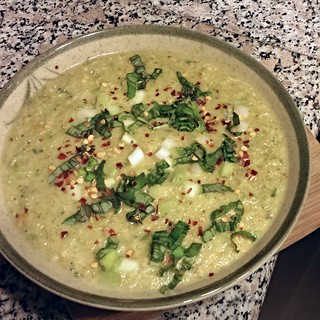
Admittedly, calling this a recipe is bit of a misnomer. Rather than set-in-stone rules, this is more like a loose set of guidelines, which generally describes my cooking philosophy too. But with cooler weather coming, I figured it's good time to share this "recipe" for miso-pesto vegetable soup. It's hearty, healthy and can be made in a hurry—from fridge & pantry to the table in under 15 minutes. 
Miso-Pesto Vegetable Soup
I also love that this feels more substantial than the typical pureed vegetable soups; even after a blitz in the blender, it still has rough, nubbly bits to give it some texture, so I don't feel like I'm on a liquid diet.

Even better yet, it utilizes ingredients that I pretty much have on standby all the time: vegetables, miso paste, pesto sauce and some seasonings. And in the latest rendition of this soup, I found it works wonderfully with a bag of frozen vegetables too (yes, that middle American mix of peas, corns, carrots, lima and green beans,) since it still gets a flavor boost from the deeply savory miso and vibrant pesto.

While this vegan soup satisfying enough as is, if I'm feeling extra indulgent I'd throw in a splash of cream and top it with some cheese too.

Tuesday, October 8, 2013

Recipe: Chocoholic Cookies

Chocoholic Cookies
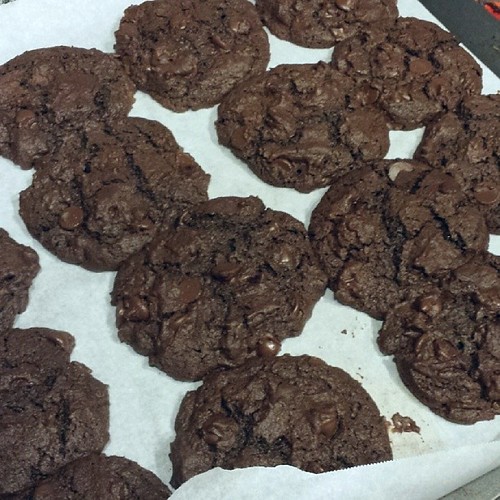
These are cookies which I can claim very little—if any—credit for, since it's basically derived from Nigella Lawson's Totally Chocolate Chocolate Chip Cookies with just a few tweaks for my preferences (most notably using dark brown sugar & extra egg for the added fudginess & chewiness factor, and a splash more vanilla to balance out chocolate's intensity). But they are everything as Nigella promises and are, per her words, "the chocolatiest cookies you will ever come across."

And they are absolutely amazing a few minutes out of the oven, with the cookie in that crumbly, fudgy stage and the chips still molten and gooey.

As an added bonus, these cookies freeze & rebakes easily so that, being the chocolate fiend enthusiast that I am, I can batch freeze them and satisfy that call for cocoa any time I want afterwards.

Tuesday, September 17, 2013

Recipe: DNA Cocktail

DNA
In short, this is my hybrid of a Negroni and a Gin & Tonic (which I recently found out was the drink that enabled England to become an empire). I came up with this on the fly after a sweat-inducing round of tennis. It's got a refreshing fizz, pleasant aromas of florals and spice, mildly bitter bite and a wonderfully crisp finish.

Plus, it's super fast to make, so ideal for instant barside cooldown. Oh, and I guess parties too.

The cocktail's name is admittedly a bit geeky, since its components comprise of gin, Campari, Angostura bitters and tonic water; let's not get into the ingredient swap to turn this into a RNA cocktail...

Friday, August 30, 2013

Recipe: Stir-Fried Pepper Corn

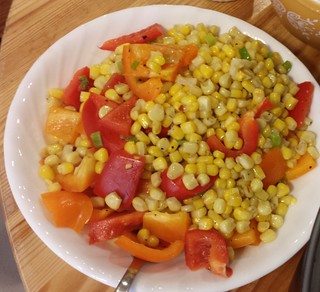
I know nothing beats shucking kernels off a freshly steamed/boiled/grilled cob, but this stir-fried pepper corn is excellent too, especially when fresh corn is out of season (you can swap in frozen corn!) And no matter what time of year, its sunny hues, sweet crunch & fiery heat (from a chili-infused oil) make for an instant, delicious throwback to warmer, brighter summer days.

Pepper Corn
This recipe is adapted from Grace Young's Stir-Frying to the Sky's Edge, my go-to reference for all things wok-related. On top of easy-to-follow recipes and useful ingredient & preparation tips, the book also includes numerous tales of how this simple cooking technique & instrument followed the Chinese population where-ever they traveled, sometimes merging with other cultures and cuisines to create dishes like Chinese-Jamaican Jerk Chicken Fried Rice and Stir-Fried Bagels (which I've tried and actually enjoyed), other times being the only means to get a taste of home no matter where they go.

Of course, there's a plethora of familiar & authentic recipes too, such as yang chow fried rice, kung pao chicken and stir-fried ginger beef (last of which she gave a video demo on.) But her summer pepper corn is one of my reliables for a party, it's a cinch to make and is a great vegetable side that easily complements many main dishes.

Monday, August 26, 2013

Recipe: Stove-Top Clambake

I know this is far from the ideal clambake, which I'd imagine would take place at a beach, with a sand pit, gathering of seaweeds and rocks, and a nice little idyllic relaxing over a bonfire, sipping some cold beers while delicious seafood cooks away from the seawater's steam.

Then again, I can also picture us getting sand into where the sun don't shine, sweating like crazy trying to gather enough ingredients under the hot summer sun, and possibly getting arrested for illegally having open containers of alcohol or digging a pit and setting on fire.

Thus, I'm more than content with my one pot, stove top version; it turned out to be a great party dish this past weekend that is full of flavor and surprisingly easy to make.
Clambake

Friday, July 5, 2013

Recipe: Hawaiian Itch

Hawaiian ItchFor July 4th, my friends wanted to do a Hawaiian themed potluck. Given how hot the day turned out, I'm glad I opted out of cooking duty. Instead of slaving over the hot stove making spam musubi and garlic shrimp (even the "no cook" poke sounds iffy, considering the prep work is done in that warm kitchen,) I opted to make tropical-ish cocktail instead.

Now, I'm not saying that this drink is anyway Hawaiian, but it combines a spiced rum with some fruits, spices and orgeat (a fragrant almondy syrup that is central to a Mai Tai) so I think this Hawaiian Itch evokes the spirit of an island vacation. It's got a few shortcuts as far as ingredients go, but the addition of fresh lime & nutmeg gives it a wonderful bright & aromatic note.

And from how fast it is downed by the party crowd (not sure if because of its coolness or deliciousness--I'd like to think it's the latter,) I think I've got a winning recipe to add to my repertoire.