Wednesday, November 20, 2019

Eat & Drink Options Along 2019 Great LA Walk Route


Even though this year's Great LA Walk takes place much closer to where I live (the route runs from Arcadia to Downtown LA via Pasadena, Highland Park, Chinatown & adjacent neighborhoods), I'm semi-bummed that I'm out of town this weekend and will not be able to partake in this pre-Thanksgiving tradition.

That didn't stop me from making an eats & drinks map for this year's participants, my own form of tribute to the late Jonathan Gold (whose attempt to dine at every restaurant on Pico Blvd. served as the dining guide for the 2007 Walk).

The map, which includes some LA classics as well as my personal faves, is available here.

Whether you're looking for a tasty jolt of caffeine, a fast grab 'n go bite, a sitdown spot to rest your legs or even a mid-hike tipple, I hope this guide will help you stay nourished & hydrated on your 18-mile trek. Happy trails! 

(& much thanks to Mike Schneider of Franklin Avenue, the Walk's organizer, for reaching out to me to put this together - it's a joy to do every time & reminds me of all the great dining options available throughout LA)

Wednesday, June 19, 2019

San Diego Highlights - May 2019

Last month, I took a semi-spontaneous trip to San Diego to visit friends (hiked up Black Mountain in the morning, board gaming in the afternoon/evening) and see Jenny Lewis perform at the House of Blues (absolutely loving her "On The Line" album, btw).

Of course, I managed squeezed in a bit of sightseeing and some tasty stops as well. Some of the highlights from the trip include:
Ramen @ Menya Ultra
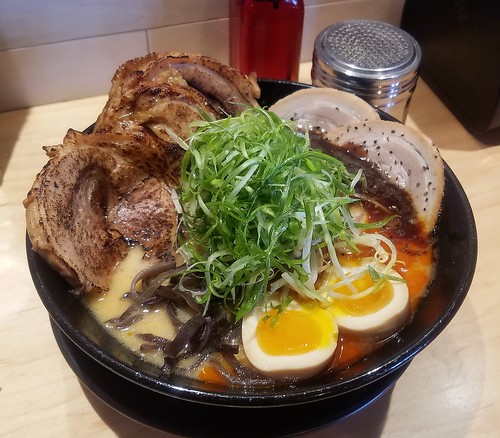
Menya Ultra's Negi Miso Ramen w "Braized" Chashu - this has been on my to-try for a while after hearing about its numerous regional, national & global accolades. And sure enough, it did not disappoint. Their housemade noodles were toothsome yet tender, the broth was incredibly complex and rich without becoming greasy or heavy, and the thick-cut slices of braised-then-grilled chashu (limited to first 10 orders of lunch & dinner service) were a wonderful meaty addition to an already solid bowl of noodles. I only wish I was able to order fewer slices of the limited edition chashu or just upgrade the regular chashu for this one... just adding three extra thick chashu was a bit of a pork overload!
Porchetta Tacos
Speaking of porky, I also indulged in the porchetta tacos at Porchetta Shack (evolution of the former Carnitas Shake Shack spot in North Park); despite a little skepticism, the herb-flavored pork works well in a taco and holds it own against the creamy guacamole & guajillo chile salsa. Definitely a consideration for future SD visits if I'm looking for something a little different than California burritos & seafood tacos.
Cheese Plate + Beer
Having recently read Liz Thorpe's "The Book of Cheese"; I was eager for any opportunity to explore & sample more cheeses to broaden my palate - and Venissimo Cheese was a wonderful spot to make that happen. Besides the picture perfect cheese plate, I loved that its North Park location is co-housed with Bottlecraft Beer Shop - which made for some interesting cheese-beer pairing possibilities. (My favorite of this quartet was Noce del Piave, an Italian cow's milk cheese that's wrapped in walnut leaves and oak barrel aged for two months, giving it intense umami & nutty notes blends beautifully with Enegren's Maple Baltic Porter)
Lobster Roll + Fries @ Wicked Maine Lobster
Wicked Maine Lobster's lobster roll is one of my favorites in the West Coast, so a re-visit is almost always in order when I dive down to SD. (And I'm beyond ecstatic that they're planning a LA shop soon!!!)
Gin Old Fashioned @ You & Yours Distillery
You&Yours Distilling for their Chai Maple Old Fashioned using their barrel aged gin, which tastes remarkably close to the whiskey original with a delightfully subtle boost of florals & spices. I absolutely adore You & Yours' gins (which I encountered on the regular at SD cocktail bars) and can't wait to add their Winter or Sunday Gins to my collection soon.
Parfait Signature @ Le Parfait Paris
For my sweet jaws tooth, I return to the reliable Le Parfait Paris for their Parfait Signature, with crispy almond praline topped with dark chocolate mousse & glaze. Though you really can't go wrong with any of their patisserie creations.
Painkiller @ Kettner Exchange

The only downer of the trip, foodwise, was missing Kettner Exchange's dinner service (like most upscale-ish sitdown places, kitchen closes approx. an hour before the bar/restaurant does), but at least I got to enjoy their KPK, their painkiller variation using a blend of 7 rums + passionfruit juice. Fingers crossed that I come back to enjoy this alongside some food next time!

8141 Mira Mesa Blvd, San Diego, CA 92126
FB / TW / IG

2632 University Ave, San Diego, CA 92104

3007 University Ave, San Diego, CA 92104
FB / TW / IG

2820 Historic Decatur Rd, San Diego, CA 92106

1495 G St, San Diego, CA 92101
FB / TW / IG

555 G St, San Diego, CA 92101
FB / TW / IG

2001 Kettner Blvd. San Diego, CA 92101
FB / IG

Monday, August 31, 2015

Recipe: Maple Nut Toffee

I don't fancy myself as much of a confectioner, considering how anxious I get over exact measurements and a big role of candymaking is boiling the syrup the right temperature.
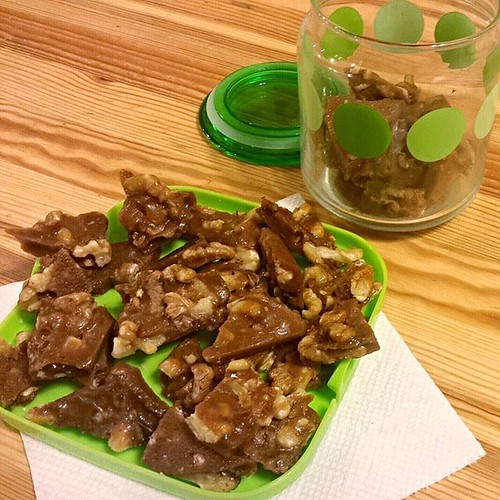
Maple Nut Toffee / Brittle
So I was rather surprised at how this easy and delicious maple nut toffee turned out, since the recipe is fairly forgiving. Instead of a thermometer (which I don't have), I used the cold water candy test. And it's a lot less stressful than one (including myself) imagine. Just plunge a small spoon's worth of syrup into cold water and use your hand to see what stage the resulting candy is.

Maple Nut Toffee / Brittle
(adapted from California Walnuts' website)
about 50-60 bite-sized pieces

Ingredients:
2 cups of raw, unsalted nuts, roughly chopped (I prefer walnuts, pecans or cashews since their softer crunch is a nice contrast against the snap of the toffee)
1/2 cup granulated white sugar
1/2 cup light brown sugar
1/4 cup grade B maple syrup*
1 cup (2 sticks) of unsalted butter, cut into smallish pieces (for faster melting)
2 teaspoons vanilla extract
1/4 cup water
extra cold water for candy testing

*the grades of maple syrup is not about quality, but whether its color (& by association, "mapliness") — for cooking I prefer Grade B since it allows that distinctive busky, woodsy flavor to shine through.

Directions:
1. In a non-stick pan over medium-high heat, heat the chopped nuts, stirring/tossing regularly. Once it starts getting toasty (you'll start smelling the nutty aromas, and the nuts will start to char around the edges), turn off heat and set aside.
2. In a stainless steel pan, combine all the other ingredients and bring to low, gentle boil over medium-high heat, stirring as needed to melt the butter and mix everything together into a syrup.
3. Once the mixture starts to boil, lower heat as needed to bring it to a simmer and allow it to heat for another 15-20 minutes. Do not stir during this time.
4. When the candy color is a medium brown, do a cold water candy test. When it hits the hard crack stage (or when it hits 300 degrees Fahrenheit — if you have a cooking thermometer), turn the heat off and remove the pan from the burner. (Per the linked page, be careful when working with the hot candy syrup)
5. Add the toasted nuts into the syrup and stir to evenly incorporate the two.
6. Pour the mixture into a baking pan (I used a 8"x12") and spread evenly to cover all edges & corners. You can use a larger pan for a thinner layer candy, making it more of a brittle than a toffee.
7. Set and allow to cool for a few hours (or overnight) at room temperature.
8. Break the sheet of toffee into bite-sized pieces to store and enjoy!

Thursday, July 9, 2015

Before / During / After the Anime Expo

20150703_101911 
Since Anime Expo usually coincides with the July 4th weekend, it's been years since I've been able to go due to other holiday plans with friends & family (let's just say the last AX I went to was before its current home at the LA Convention Center.) But since this year's long weekend was relatively free of events, I snatched up a ticket and braced myself for a day of serious anime & manga nerding out.  Yes, I only got a one-day pass as opposed to the standard four-day weekender; I figured after a many years hiatus I'm better off easing myself back into this.
Grand Central Market Breakfast
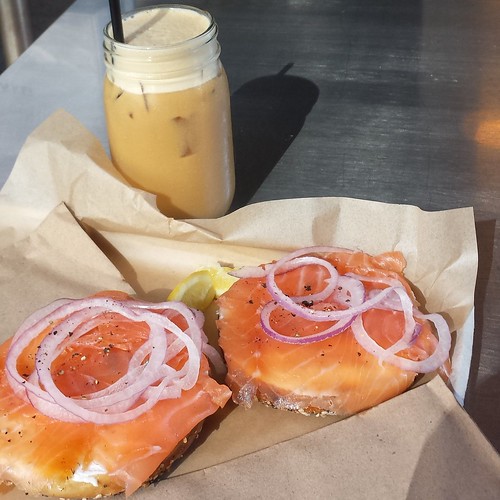
To properly nourish myself before the Friday expo, I headed to Grand Central Market, where I skipped the weekend silliness of Eggslut and opted for lox on an everything bagel at Wexler's Deli with an iced almond-macadamia milk latte from G&B coffee. And it made for a divine breakfast - the translucent, silky pieces of salmon were perfectly highlighted, but not upstaged, by the lightly-pickled onions, puckery bits of capers and the perfect amount of cream cheese. Likewise, my latte was just sweet enough to show off the nut milks' natural flavors.

After the satisfying meal, I did a little urbanhike tos the convention center, where throngs of fans were already waiting for the doors to open. Just like the AX I remembered from years past... but larger.
Anime Expo collage
Some other AX observations from this old-school otaku:

Friday, May 22, 2015

Friday Nights & Caramelized Onions . . .

Whereas my friends and colleagues are planning dates, get-togethers or a headstart on a roadtrip (especially for this long weekend,) Friday nights for me mean busywork in the kitchen. Sometimes it could be batching up flavored syrups for cocktails & sodas. Or eke out a weekend dish from whatever leftovers I've stashed up throughout the week.

Or, more likely, spend the better part of an hour caramelizing onions to jar up & have on the ready for the next week or so.
I agree with Tom Scocca that there are simply no legit cooking shortcuts around caramelizing onions. It simply takes time and patience. (Yes, there's the "set it and forget it" slow cooker method too - but I always found the flavor & texture results subpar to the pan version, plus there's the room full of acrid rawish onion smell during the early stages of this method.)

However, one preparation shortcut I will take is buying pre-diced onions at the market, given my affinity for crying out a river whenever I have to cut them myself. I agree it doesn't have visual or tactile appeal of the long curls, but it's a compromise I can live with. And hey, these remind me of the grilled onions at In 'n Out!

Also — caramelized onions purists will balk at this — I do add a splash of maple syrup at the end of the process too. Not that the onions needed any additional sweetening after all that time caramelizing, but the syrup does give it a welcoming warm & woodsy depth. Oh, and a splash of balsamic or sherry vinegar to balance out the extra sugar.

But rather than lament about the time wasted on caramelizing onions, I make the best of those 45 minutes. I put on a lengthy podcast, pour a glass of wine or beer and flip through some magazines, with the occasional stir to reassure the onions that, "Yes, I'm here until you turn into burnished, brown morsels of deliciousness."

And that's more satisfying than any Friday night outing in a chaotic & crowded restaurant/bar/club can ever do.

Maple-Balsamic Caramelized Onions
Makes 12 oz of caramelized onions
Prep Time: Approx. 45 minutes

Ingredients:
24 oz. diced white onions (or approximately 3 medium onions diced)
2 tablespoons extra virgin olive oil
1/2 teaspoon salt
1 tablespoon maple syrup
2 teaspoons balsamic vinegar
water

Directions:
1. Pour oil in a large skillet over medium heat, once it gets hot enough (the oil starts getting runny), add onions and salt. Stir until the onions and thoroughly coated in oil. Lower heat to medium.
2. Stir the onions occasionally (once ever 3-5 minutes) to distribute heat and prevent bottom layer from burning. If it looks too dry, add a splash or two of water.
3. In the meantime, relax! Enjoy a glass of beer/wine. Put on some music or a podcast. Get some leisure reading on.
4. About 40 minutes in, the onions should be a medium to dark brown. Stir in the maple syrup and balsamic vinegar. Taste and adjust as needed (more syrup/balsamic/salt).
5. Use immediately or store for up to two weeks in a fridge (if it lasts that long!)


Wednesday, November 19, 2014

Eating & Drinking Options Along the Great LA Walk

Almost sunset @ Pier 
No ocean views at the end of this year's walk, but that's OK.

I can't believe it's time for the Great LA Walk again this Saturday, my favorite of the organized urbanhikes in the area. This time, walkers will be tackling "the Valley" with the fearless Franklin Avenue leading a 17+ mile hike down Ventura Blvd from Woodland Hills to Universal City, then an upward swing to NoHo via Lankershim Blvd.

Of course, equally exciting is the prospect of checking out some of the eats/drinks in the area, since I don't find myself in this area all that often...

...and this quickly turned into a behemoth list of a to-trys & to-revisits, so figured I might as well share this map with fellow Great LA Walkers too.
Hopefully, this will disprove any notion of the Valley being devoid of good food & drinks. Whether you want something casual but tasty (Mendocino Farms, BatterFish), more exotically ethnic eats (e.g. Apey Kade, DarbinZ), a refreshing glug of potent potables (Boneyard Bistro, Murph'sThe Local Peasant) or a guilt-free, healthy bite (LYFE Kitchen, SunCafe), there's something on the map that should fit the bill. And failing all else, I also put in a few markets for stocking up on hiking provisions.

Now the hard part is figuring out where I will be stopping along the way... (asides from the official afterparty @ District Pub, obviously.)

Tuesday, November 18, 2014

Seven favorite bites & sips in San Diego

Even though SD is only two hours away (less... if you drive like a speed demon), with so many going ons in the rest of SoCal I'm lucky to make it down there twice a year. So when I do have the occasion to go, I try to make every moment, bite and sip worthwhile.

This most recent expedition (where I was helping out at a friend's wedding, then took a few extra days to explore on my own) was no exception. 

Of course, this made the task of narrowing down my favorites even harder, but I manage to eke out a top seven from the area . . .

7) Rye So Serious from Groundswell Brewing (Grantville)
Groundswell Brewing
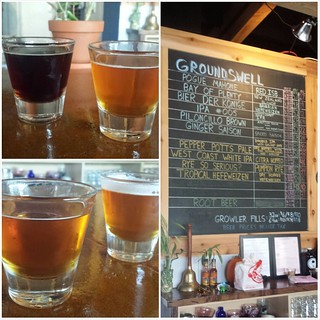
While I'm no stranger to the burgeoning craft beer scene down here (and I did visit my longtime favorites of Ballast Point & Lost Abbey this time around), I'm always on the lookout for new and interesting breweries to try. Thanks to @VisitSanDiego's pointer to check out Grantville area breweries, including recently opened Groundswell Brewery.

Although the tasting room is pretty bare bones, they more than make for it with their whimsically named, creatively-flavored beers. My favorite of the four I tasted is definitely the pumpkin-infused Rye So Serious, where the typical spicy-bitterness of the rye ale is nicely balanced with the earthy-sweetness of the pumpkin. Alas, since this is a seasonal beer I don't expect it to stay on the menu long, but at least my runner-up (the Ginger Saison) is in their standard year-round lineup!

6) "Garden & Grains" from Juniper and Ivy (Little Italy)
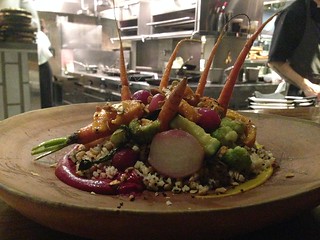
Garden & Grains @ Juniper and Ivy
From a quick search for popular SD restaurants, this seems to be the *it* spot of the moment so I made a timely reservation to check it out (and it wasn't until later that I learned it was headed by Top Chef All Stars winner Richard Blais.)

Given my overindulgence earlier that day, I opted for a lighter meal . . . and super thankful that I did. Their simply named "Garden & Grains" was a vegetarian (perhaps even vegan) delight that even omnivores could enjoy. Crisp, fresh vegetables played nicely with the toothsome mix of ancient grains (incl. amaranth, wheatberries & quinoa) and sweet swirls of red and golden beet purees. As an added bonus, this dish saves fantastically well, from the half I boxed up and chowed down on the morning after.

Another practically a must try (from all the orders I've seen sent out from the kitchen), the decadently beefy and tender carne cruda asada with quail egg on toast.

Friday, October 24, 2014

A Few Fave Flavored Teas For Fall

Because I'm an alliteration addict, but I digress...

Now that the weather's finally cooling down, I can regularly embrace steeping teas on a regular basis. And although I do enjoy a clean cup of sencha or a robust Darjeeling, lately I have been exploring flavored teas. No, I'm not talking about something that smells like a Bath & Body Works (I'm looking at you, Teavana!) but ones that are more nuanced and delicate, working with the tea leaves natural aromas & flavors rather than trying to mask it.

And here are a few of my favorites for varying moods & occasions:

Something fruity: Thé des Alizés from Palais des Thes'

This Parisian tea company was the one that began my intrigue (& eventual embrace) of flavored teas, back when they were used for Jin Patisserie's afternoon tea service. While it's hard to pick a favorite flavored tea from this company, I'm particularly enamored with this one because the lush, juicy notes of peaches, kiwi & watermelon plays so nicely with the delicately sweet-grassy notes of the green tea. And it's great one to have year-round, since it works amazingly well as an iced tea too!

Something floral: La Vie en Rose from American Tea Room

Monday, August 25, 2014

Recipe: Peachy-Basil Sangria

Summer may be rolling to a (too fast) end, but there's still Labor Day weekend & plenty of warm days ahead.
Peachy-Basil Sangria
And per my summer potluck/party tradition, that also means it's sangria time! And this year's version might be my favorite yet, since it goes down so easy but has a few touches to keep the flavors interesting. On top of lusciously sweet & fragrant peaches, I've also added a hearty helping of refreshing aromatic basil and a pinch of sweet spices. Then the batched syrup is spiked with a nice slug of gold rum and ready to be combined with some crisp white wine & served when needed.

Peachy-Basil Sangria (for 2 pitchers' worth, approx. 10 to 16 servings)

Ingredients:

3 ripe medium peaches, peeled, pitted and sliced (alternatively, a 12 oz. bag of frozen peaches)
2 cups water
1 cup sugar
1 handful of fresh sweet basil leaves, plus additional for garnish
1 teaspoon ground cinnamon
1/2 teaspoon freshly grated or ground nutmeg
3/4 cup gold rum (I used Mount Gay Eclipse)
2 bottles of light and crisp white wine (I used Flip Flop's pinot grigio)
Ice cubes
1 medium ripe nectarine, for garnish (optional - and I only opted for the nectarine because I don't care for peaches' fuzzy skin)
Virgin option: Omit the rum, swap white wine for dry ginger ale.

Directions:

1. In a medium saucepan, combine water, peaches, sugar, cinnamon and nutmeg. Bring to a gentle boil, then reduce heat and let it simmer uncovered for 15 minutes. Allow it cool on stovetop for 10 minutes afterwards.
2. Place the mixture in a blender along with the fresh basil leaves, then pulse blend until the leaves are pulverized and incorporated. Then add rum to the mixture. The color/appearance will be a bit unseemly but this will improve when combined with the wine. (This mixture can also be stored up to three days in a fridge.)
3. In a pitcher, combine the wine & syrup in a 2:1 ratio and give it a quick stir, garnish with additional basil leaves and nectarine slices. Serve over ice.

Monday, May 5, 2014

Fun Facts Learned During California Avocado Grove Tour

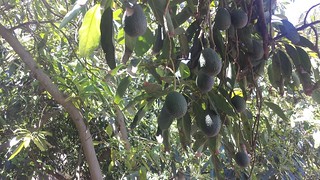
Since Cinco de Mayo is one of the highest avocado-consuming days of the year, I figured its timely to post about my California Avocado tour in the Temecula Valley. And even though my love & familiarity with this buttery fruit spanned decades, I was surprised by the number of things I learned during this one-day outing.
avocado on trees
Our first stop was Persea Tree Nursery in Fallbrook, a nursery & greenhouse facility that grows, grafts and sells avocado rootstocks to groves and orchards. 
Avocado Nursery
As we toured through the facility, including an "avocado dark room" & swelteringly hot greenhouse (the humidity helps these young plants — which are native to the tropics — thrive,) I picked up on these fascinating tidbits:
  • a single avocado pit can supply enough energy to start up to 6-7 plants.
  • when properly cared for, a tree can start producing edible fruit in 2 years.
  • when stressed, the trees have a tendency to bear fruit on alternate years - resulting in a cycle of high & low yields (and consequently, prices in the market.)
  • 95 percent of avocados produced in California are of the Hass variety (I knew they are the most popular, but wasn't aware of how big a majority they made up; meanwhile, I'm crossing my fingers for the giant, round Reeds - my favorite varietal - to take up more of the market share & be more readily available.)

Thursday, May 1, 2014

Pleasure of a Weekday Off at Copa Vida, Petrossian LAX & Crustacean

When given the option of an extra day off, most folks I know prefer to bookend their weekends, tacking on a Monday or Friday. Me? Personally, unless I have an out-of-town excursion, I actually prefer taking midweek days off. It splits up the workweek, I can "staycation" on a mellower day of the week, and not worry about the traffic & crowds from other long weekenders too.

Of course, being able to partake in some tastings was the icing on that cake. So that's exactly what I did last Wednesday.

My first pleasure was, to no one's surprise, sleeping in. Even though I did freak out and bolted up on my usual workday time, upon realizing "oh yeah, I took today off" I went back into the bliss of the warm bed and slumbered for another lovely 2 hours.
After finally getting up & ready around 10:30 a.m., I had a quick but leisurely breakfast at Copa Vida, my new favorite "fancy coffee" place in Pasadena. 
Normally I wouldn't hesitate to order their divine open-faced Croque Madame, but there's another food affair coming up soon so I opted for their ham-cheese-caramelized onions stromboli. And of course, one of their fantastic pourover coffee of the day (this time it's the Colombian El Roble estate roasted by 49th Parallel.)
Following the late breakfast, I headed to LAX; not to fly anywhere, but to check out Petrossian's newly opened shop at their new champagne & caviar bar at the Tom Bradley International Terminal (which has gotten quite a facelift recently). There, we were treated to caviar & roe-topped bites by Giselle Wellman, who heads up the kitchen here & at the Petrossian West Hollywood Restaurant/Boutique. They were all delicious, but my personal favorite were a simple spin off the classic caviar presentation—with a dollop of creme fraiche on a buckwheat blini.

Monday, March 31, 2014

Recipe: Express Tiramisu

Back in the mid-late 90s, tiramisu was the "it" dessert. And thus, it was something I consistently order every time I see it on the menu, all the while feeling very sophisticated about the layers of cake & custard, with a hit of coffee and sometimes a splash of booze.

And even though this dessert has already seen its heyday, it's still something I whip up regularly for gatherings. Just saying that you're bringing tiramisu to a party lends a whole sense of "Ooo la la," even though it's impeccably easy to make. Moreso given the time- & effort-saving shortcuts I take, which means it's really a little prep work (namely, brewing then cooling down some coffee), half an hour for mixing & assembly and then a few hours' (or overnight) in the fridge before serving.

Express Tiramisu (serves 6-8)

Ingredients:

  • 18 ladyfinger cakes (readily available at Italian markets)
  • One 8 oz. package of cream cheese, softened
  • 4 oz. ricotta cheese
  • 4 oz. heavy whipping cream
  • 1 cup granulated sugar, divided in half
  • 1 tablespoon vanilla extract
  • 1.5 cup espresso or strongly-brewed coffee, cooled to room temperature
  • 2 oz. simple syrup (1:1 sugar-water mix)
  • 3 oz. Amaretto, or your liqueur of choice (optional)
  • Chocolate shavings for garnish (I used a vegetable peeler on a bar of dark chocolate)
Directions:
  1. In a shallow pan or dish, combine coffee, simple syrup and Amaretto, set aside.
  2. In a separate bowl, combine cream cheese, ricotta cheese, half cup of sugar and vanilla extract; mix until smooth
  3. By hand or machine, whisk together half cup of sugar with the heavy whipping cream until it has soft-to-medium peaks. Then gently fold into the cream & ricotta cheese mixture.
  4. Dip ladyfingers, one at a time, into the coffee mixture - gently rolling both sides until they start to soften, then place in a 8" x 8" dish or pan. Repeat until you have one layer of coffee-soaked ladyfingers in the dish (feel free to break apart the cakes as needed to fill any big gaps or holes.)
  5. Use a spatula or wooden spoon to spread a thin layer of the cheese mixture until the ladyfingers are no longer visible.
  6. Repeat with another layer of soaked ladyfingers & cheese mixture. 
  7. Top with chocolate shavings, cover with plastic wrap and chill in fridge for at least 3 hours (or overnight). Serve chilled.

Friday, February 21, 2014

Recipe: Grilled Halloumi w Pickled Onion

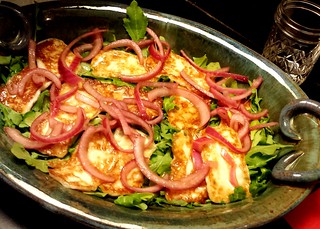
Grilled Halloumi w Pickled Onions & Arugula 
This is one of my standby appetizers when I'm going to a potluck or hosting a party. It's vibrantly colorful with translucent, jewel-like red onions set against bronzed slabs of halloumi and a bed of fresh greens and more importantly for gatherings—this crowd pleaser is a cinch to make, so you can actually enjoy the party too rather than slave away in the kitchen.

Simply give the onions a quick chop & pickling an hour prior, then pan fry some halloumi on a pan just prior to serving. Then voila, a plate of oozy, salty cheese (which is what I love about halloumi, its high melting point means you can get a crispy char on the outside while it retains a softened, almost but not quite melted texture within) whose richness is cut with acidic onions and peppery arugula.

In hindsight, I kinda feel guilty even calling this a "recipe", but the results are definitely splendid.

Grilled Halloumi with Pickled Onion

Ingredients (serves approx. 8)
14 oz. Halloumi cheese, sliced into quarter-inch slabs
1 small red onion, cut in half vertically, then thinly sliced so you get semi-circles out of the rings
4 oz. red wine vinegar
1 oz. water
1 teaspoon sugar
2 cups arugula, washed & dried (or your leafy greens of choice)
vegetable oil

Directions:
1. About an hour before serving, put the sliced onions in a bowl or a jar and add vinegar, water and sugar. Swish or shake occasionally, making sure all the slices have some time to immerse in the vinegar mixture.
2. 10 minutes before serving, heat up a skillet on medium-high heat for 30 seconds. While skillet is heating, put the arugula in a platter.
3. Add enough vegetable oil to coat the surface of the skillet, then put the cut slabs of halloumi cheese in.
4. In about a minute or two (when you see the edges of the cheese getting golden brown & bubbly), flip the halloumi and allow it to pan fry for another minute.
5. Put the halloumi on top of the arugula, then the pickled onion slices.
6. Pour half the pickling brine onto the skillet to deglaze, then drizzle over platter and serve.

Thursday, January 16, 2014

Fave Bites & Sips from Vegas, Dec. 2013

With T-24 hours before I head to Las Vegas, so Sin City's definitely been on my mind lately — and it's a good a time as any to reminisce some of my favorite bites & sips from my last excursion there... a month ago.
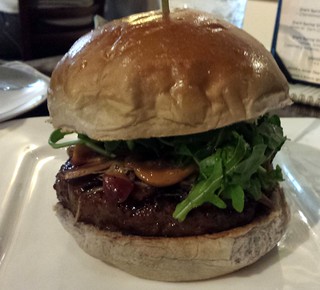
Mr. Ho's Burger @ Bachi Burger
I know, gussied up burgers aren't anything new - but I definitely dug Bachi's Mr. Ho's burger, when the burger was given an Asian treatment with garlic, ginger, sauteed mushrooms and lop cheong (Chinese sausage) - the last ingredient, with its sweet-savory fattiness, is what made it extra memorable. And kinda makes me want to buy some and put it on everything!

We also tried their famous foie-gras Shogun burger too, while that was good too -- the foie totally got lost within all the other ingredients.
Garden of Hermitage @ Vesper Bar
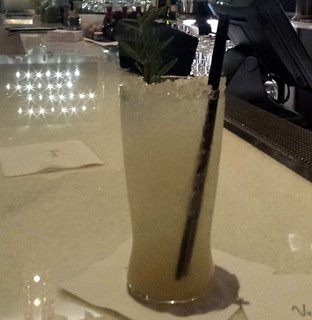
Drinks-wise, a return to Cosmpolitan's Vesper Bar was a must. While the near-unanimous favorite with my friends is the One Night in Bangkok from a former menu (a refreshing Thai twist on a Ramos gin fizz), from their current menu I loved their Moscow Mule spin -- the Garden of Hermitage with Enlightened Spirits' Rosemary-Lavender vodka, Thai basil eau de vie, basil, ginger & lemon. I was afraid it'll be too perfumey at first, but the aromatics were nicely balanced and gave this effervescent drink that uniquely fragrant je ne sai quoi.

Other modern interpretations there that I love: The Last Samurai (a Rob Roy twist with Japanese whisky, punsch & amaro nonino) & Chai One On (Brandy milk punch given a spicy twist with chipotle, Masala & even a Yogurt liqueur!)

Monday, January 6, 2014

Embracing fitness for the new year...

Shadow selfie
A shadow selfie during one of my urbanhikes
around Socal.
... I know, not a very novel concept around this time of year, when gyms are filled to brim, workout classes are booked to the max, and people are generally scrutinizing every calorie they consumed & burned.

But for the Type B me, I'd much rather take a relaxed approach to fitness & healthfulness. And thus, some of the "goals" for the year include:
  • Finding more activities I enjoy and just do them.
  • Naturally incorporate more activity throughout the day (taking the stairs, parking further from destination).
  • Focus on how I feel after the workout.
  • Progress on my exercise performance without over straining.
And for something more concrete, putting in the recommended 150+ minutes of activity a week & hitting my 11,000 daily steps at least 3 days a week.

All of these were notions that were reinforced in a resolution-themed tweetchat I participated in last week under my @foodie_fitness alter-ego*. The two biggest takeaways, doing anything is better than nothing at all . . . and unless you're really enjoying the workout itself—as opposed to its effects—it's all too easy to throw in the towel.

With this in mind, I plan on going on a little "fitness dating" (a term I'm borrowing from Jeanette DePatie a.k.a. The Fat Chick, who co-hosted the tweetchat) this & next month, just so I can have a few more fun workouts to add to my usual mix of tennis, hiking, rollerblading, cardio-dancing & kickboxing, yoga and good ole fashioned jogging.

Here's to a healthy & fit 2014!

*Disclosure: City of Hope, the other co-host of the tweetchat, is where I punch my 9 to 5. But thoughts, opinions expressed on the @foodie_fitness twitter handle are my own.


Sunday, December 15, 2013

Giveaway: Hodgson Mill baking products (CLOSED)

http://www.hodgsonmill.com/
In addition to providing their product for the lemon-raspberry sour cream cake I made recently, Hodgson Mill is also partnering with me for a giveaway. One lucky winner will get $25's worth of either whole grain or gluten free baking products to use for their very own grain holiday.

To enter into this giveaway: (contest is closed)

Friday, December 13, 2013

Recipe: Lemon-Raspberry Sour Cream Cake

For me, chilly winter weather (OK, as chilly as Southern California gets) means time to fire up the oven so I can flood my home with that wondrous freshly-baked aromas & a blast of comforting warmth.

All this was made even better when I entered Hodgson Mill's "Have a Grain Holiday" recipe contest, since I get to be creative in crafting a recipe and get a batch of their lovely baking products too. (Actually, you can get a chance at their baked goods too by entering their sweepstakes, and if you missed out on that - here's a $1 off coupon for you to use through the end of Feb.)

And for my blog readers, here's an extra giveaway opportunity for their baking products.

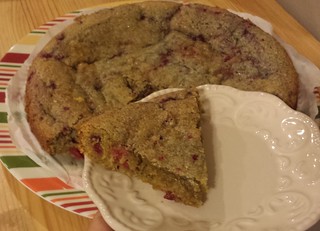
Lemon-Raspberry Sour Cream Cake And while I know winter usually call for baked goods that are hearty, robust and spicy (fruitcakes, gingerbreads and the like,) I think it's a refreshing change of pace to have some bright and sunny too -- thus my lemon-raspberry sour cream cake. It's light in texture, tender in mouthfeel with the mildest crunch from a sugar topping, and the perfect fruity tang to balance its sweetness.

Slices of this cake can pass off as a breakfast pastry. Or if you're feeling more indulgent, top it with a fruity dessert sauce, light frosting or scoop of sorbet for a simple yet elegant dessert dish.

Lemon-Raspberry Sour Cream Cake

Ingredients
  • 1 cup flour (I used Hodgson Mill's White Whole Wheat Flour)
  • 1 teaspoon baking powder
  • 1/2 teaspoon baking soda
  • 1/4 teaspoon salt
  • 1 stick unsalted butter, softened
  • 3/4 cup granulated sugar
  • zest of 2 lemons (approx. 2 tablespoons)
  • 1 egg, beaten
  • 1 teaspoon vanilla extract
  • 1/2 cup sour cream
  • 1 cup frozen raspberries
  • 1 tablespoon raw/turbinado sugar
  1. Preheat oven to 425 F and line the bottom of a 9 inch cake pan with parchment paper.
  2. In a bowl, whisk together flour, baking powder, baking soda and salt. Set aside.
  3. In a larger mixing bowl, toss the granulated sugar and lemon zest together; add butter then cream until smooth. (You can also use the butter paper to grease the sides of the cake tin.)
  4. Add sour cream, vanilla and egg and combine until smooth. Then add flour mixture in 2-4 batches, stirring until well-combined each time.
  5. Gently add the frozen raspberries and stir until they are well distributed throughout the batter.
  6. Pour batter into the cake pan and smooth out with a spatula or clean hands until it's even throughout (the batter is on the thicker side.)
  7. Sprinkle the turbinado sugar on top and put in oven's middle rack.
  8. Bake for 30 minutes, testing for doneness as needed (a toothpick inserted in center of cake should come out clean.)
  9. Let cool for 10-15 minutes, then serve. 
Disclosure: Hodgson Mill had provided the flour used in this recipe.

Saturday, November 23, 2013

Eat My Blog 5.0 Happening Today!

Today's the Eat My Blog bake sale (with proceeds benefiting the Philippine Red Cross for Typhoon Haiyan relief), so come on down to Coolhaus Pasadena from 10a to 1p today buy some delicious baked goods from bloggers & pros.

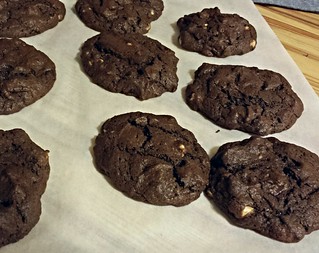
As for my contribution? Freshly baked chocoholic cookies (and I do mean fresh, they're being baked in batches right now!)
Chocoholic Cookies for #EatMyBlog bake sale
The recipe is available here (my only modification for the #EatMyBlog edition is I did 50/50 white chocolate & dark chocolate chips.)

Tuesday, November 19, 2013

Recipe: Crispy Mustard-Herb Roasted Potatoes with Pancetta & Cider-Mustard Sauce

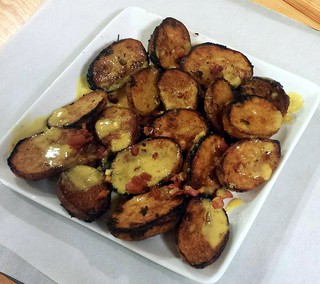
Mustard-Herb Roasted Potatoes w Pancetta & Cider-Mustard Sauce 
The recipe for this dish came about rather serendipitously . . . I had just read J. Kenji Lopez-Alt's (a.k.a. SeriousEats' Food Lab) tips & tricks for ultra-crispy oven-roasted potatoes and was waiting for an occasion to give it a try (as well as my own flavor twist to his recipe.) Around the same time, I got picked to participate in a Mystery Ingredient Blogger Showcase to craft a recipe using their secret ingredient, which turned out to be Colman's Mustard. So I basically blended the techniques of the former and the flavors of the latter for my Crispy Mustard-Herb Roasted Potatoes with Pancetta & Cider-Mustard Sauce.

The result from that marriage was nothing short of awesome. Thanks to the par-boil & high temperature roasting with generous—but not frightening—amounts of oil, the potatoes were amazingly crispy on the outside with a wonderfully creamy and fluffy interior. And the aromatic bite of the mustard (used in both powdered & paste forms) was an elegant balance to those baked taters, the cider cream sauce's rich, fruity sweetness and the smoky-salty bits of pancetta.

And like most of my other recipes, this one is a cinch to make. And because the potatoes stay crispy for a while (and is even delicious cold) you can make this show-stopper side ahead of time, just save the sauce for drizzling right before serving for that dramatic & flavorful finish.

Crispy Roasted Mustard-Herb Potatoes with Pancetta & Cider-Mustard Sauce

Ingredients:
  • 3 pounds baby potatoes, washed and cut in half lengthwise
  • 1 tablespoon rice vinegar
  • 1 tablespoon table salt
  • 1 teaspoon kosher salt 
  • 10 thyme sprigs
  • 7 tablespoons vegetable oil
  • 2 teaspoons Colman's mustard powder
  • 12 garlic cloves, peeled
  • 4 ounces diced pancetta
  • 4 ounces hard cider
  • 1 tablespoon Colman's prepared mustard
  • 2.5 ounces heavy whipping cream
  • 1 teaspoon cornstarch
  1. Preheat oven to 500 F; line a 8 x 12 sheet pan with aluminum foil and put it in the oven while it's preheating
  2. In a large enough saucepot, put potatoes in with enough water to cover it along with the table salt and rice vinegar. Bring it to boil over high heat, then turn the heat down to a simmer and let it simmer for 5-7 minutes (it should just start to yield when poked with a knife.
  3. While potatoes are simmering, combine the leaves from 5 thyme sprigs, kosher salt, mustard powder, and 3 tablespoons of vegetable oil in a large bowl and whisk with a fork until well blended.
  4. Drain the simmered potatoes, then toss them in the oil mixture until they are well coated; remove the heated sheet pan from the oven and generously coat with the remaining oil. Carefully lay the potatoes cut side down on the pan, and place in oven's middle rack to heat for 25 minutes.
  5. Remove from oven and turn the potatoes cut side up - carefully adding garlic cloves in the gaps between the potatoes. Put back in oven to heat for another 20-25 minutes (when the skin starts to char and the cut-side flesh is a deep golden brown.)
  6. While the potatoes are heating the 2nd time around, heat up the pancetta in a skillet on the stove at high heat. When it browns and crisps, remove them and set aside, leaving the rendered grease in the skillet.
  7. Turn heat to medium and pour in hard cider to deglaze, using a spatula or wooden spoon to scrape any pancetta bits stuck to the skillet.
  8. After the initial bubbles dissipate, add cream, English mustard, and cornstarch. Whisk vigorously, breaking up any lumps that may form.
  9. Let the sauce simmer for 1-2 minutes until it starts to thicken, then turn heat off and set aside.
  10. When the potatoes are ready, scoop onto a plate and sprinkle on the crisped pancetta; garnish with remaining thyme sprigs and drizzle on sauce just before serving.

Tuesday, November 5, 2013

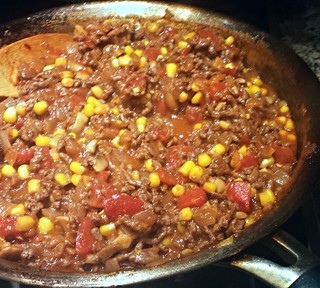
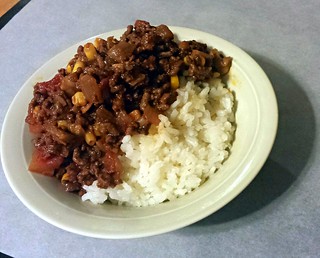
Recipe: California Ragù

Untitled
I know, corn is not a traditional meat ragù component (and I was already picturing throngs of Italian grandmothers screaming obscenities at me as I added it into the sauce,) but I personally love the color and flavor these golden nuggets of sweetness contribute, balancing the tomato's acidity, crushed chili flakes' heat and the earthy-savory combination of beef, onions and mushrooms. And to give it a good measure of sophistication, a healthy dose of Port to add some complexity to the whole affair without having to wait for it to reduce like one would with red wine.

I figured if I added California as an adjective to this dish, anything goes right? (Sorry if you came here thinking I'd add avocados to the recipe; I haven't... yet.)


Corniness aside (and you're free to omit them if you want to, but don't knock it till you've tried it), this is a supremely easy but deeply satisfying one-pan wonder, and perfect for those times when you want something comforting without wanting to put in a lot of effort. It takes under 45 minutes from start to finish, and most of that is just stirring & adding of ingredients. And I'd wager someone better at multi-tasking than I am can get this done in half an hour.
Untitled
My personal preference for eating this ragù is with rice, which soaks up the flavors beautifully while still retaining their fluffy texture. But feel free go traditional and use it to top some pasta, or even on its own with some shredded cheese on top and crusty bread on the side.