Thursday, May 1, 2014

Pleasure of a Weekday Off at Copa Vida, Petrossian LAX & Crustacean

When given the option of an extra day off, most folks I know prefer to bookend their weekends, tacking on a Monday or Friday. Me? Personally, unless I have an out-of-town excursion, I actually prefer taking midweek days off. It splits up the workweek, I can "staycation" on a mellower day of the week, and not worry about the traffic & crowds from other long weekenders too.

Of course, being able to partake in some tastings was the icing on that cake. So that's exactly what I did last Wednesday.

My first pleasure was, to no one's surprise, sleeping in. Even though I did freak out and bolted up on my usual workday time, upon realizing "oh yeah, I took today off" I went back into the bliss of the warm bed and slumbered for another lovely 2 hours.
After finally getting up & ready around 10:30 a.m., I had a quick but leisurely breakfast at Copa Vida, my new favorite "fancy coffee" place in Pasadena. 
Normally I wouldn't hesitate to order their divine open-faced Croque Madame, but there's another food affair coming up soon so I opted for their ham-cheese-caramelized onions stromboli. And of course, one of their fantastic pourover coffee of the day (this time it's the Colombian El Roble estate roasted by 49th Parallel.)
Following the late breakfast, I headed to LAX; not to fly anywhere, but to check out Petrossian's newly opened shop at their new champagne & caviar bar at the Tom Bradley International Terminal (which has gotten quite a facelift recently). There, we were treated to caviar & roe-topped bites by Giselle Wellman, who heads up the kitchen here & at the Petrossian West Hollywood Restaurant/Boutique. They were all delicious, but my personal favorite were a simple spin off the classic caviar presentation—with a dollop of creme fraiche on a buckwheat blini.

Monday, March 31, 2014

Recipe: Express Tiramisu

Back in the mid-late 90s, tiramisu was the "it" dessert. And thus, it was something I consistently order every time I see it on the menu, all the while feeling very sophisticated about the layers of cake & custard, with a hit of coffee and sometimes a splash of booze.

And even though this dessert has already seen its heyday, it's still something I whip up regularly for gatherings. Just saying that you're bringing tiramisu to a party lends a whole sense of "Ooo la la," even though it's impeccably easy to make. Moreso given the time- & effort-saving shortcuts I take, which means it's really a little prep work (namely, brewing then cooling down some coffee), half an hour for mixing & assembly and then a few hours' (or overnight) in the fridge before serving.

Express Tiramisu (serves 6-8)

Ingredients:

  • 18 ladyfinger cakes (readily available at Italian markets)
  • One 8 oz. package of cream cheese, softened
  • 4 oz. ricotta cheese
  • 4 oz. heavy whipping cream
  • 1 cup granulated sugar, divided in half
  • 1 tablespoon vanilla extract
  • 1.5 cup espresso or strongly-brewed coffee, cooled to room temperature
  • 2 oz. simple syrup (1:1 sugar-water mix)
  • 3 oz. Amaretto, or your liqueur of choice (optional)
  • Chocolate shavings for garnish (I used a vegetable peeler on a bar of dark chocolate)
Directions:
  1. In a shallow pan or dish, combine coffee, simple syrup and Amaretto, set aside.
  2. In a separate bowl, combine cream cheese, ricotta cheese, half cup of sugar and vanilla extract; mix until smooth
  3. By hand or machine, whisk together half cup of sugar with the heavy whipping cream until it has soft-to-medium peaks. Then gently fold into the cream & ricotta cheese mixture.
  4. Dip ladyfingers, one at a time, into the coffee mixture - gently rolling both sides until they start to soften, then place in a 8" x 8" dish or pan. Repeat until you have one layer of coffee-soaked ladyfingers in the dish (feel free to break apart the cakes as needed to fill any big gaps or holes.)
  5. Use a spatula or wooden spoon to spread a thin layer of the cheese mixture until the ladyfingers are no longer visible.
  6. Repeat with another layer of soaked ladyfingers & cheese mixture. 
  7. Top with chocolate shavings, cover with plastic wrap and chill in fridge for at least 3 hours (or overnight). Serve chilled.

Friday, February 21, 2014

Recipe: Grilled Halloumi w Pickled Onion

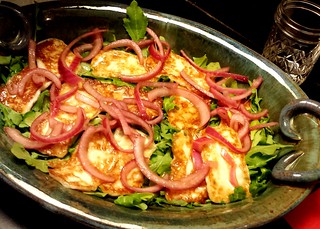
Grilled Halloumi w Pickled Onions & Arugula 
This is one of my standby appetizers when I'm going to a potluck or hosting a party. It's vibrantly colorful with translucent, jewel-like red onions set against bronzed slabs of halloumi and a bed of fresh greens and more importantly for gatherings—this crowd pleaser is a cinch to make, so you can actually enjoy the party too rather than slave away in the kitchen.

Simply give the onions a quick chop & pickling an hour prior, then pan fry some halloumi on a pan just prior to serving. Then voila, a plate of oozy, salty cheese (which is what I love about halloumi, its high melting point means you can get a crispy char on the outside while it retains a softened, almost but not quite melted texture within) whose richness is cut with acidic onions and peppery arugula.

In hindsight, I kinda feel guilty even calling this a "recipe", but the results are definitely splendid.

Grilled Halloumi with Pickled Onion

Ingredients (serves approx. 8)
14 oz. Halloumi cheese, sliced into quarter-inch slabs
1 small red onion, cut in half vertically, then thinly sliced so you get semi-circles out of the rings
4 oz. red wine vinegar
1 oz. water
1 teaspoon sugar
2 cups arugula, washed & dried (or your leafy greens of choice)
vegetable oil

Directions:
1. About an hour before serving, put the sliced onions in a bowl or a jar and add vinegar, water and sugar. Swish or shake occasionally, making sure all the slices have some time to immerse in the vinegar mixture.
2. 10 minutes before serving, heat up a skillet on medium-high heat for 30 seconds. While skillet is heating, put the arugula in a platter.
3. Add enough vegetable oil to coat the surface of the skillet, then put the cut slabs of halloumi cheese in.
4. In about a minute or two (when you see the edges of the cheese getting golden brown & bubbly), flip the halloumi and allow it to pan fry for another minute.
5. Put the halloumi on top of the arugula, then the pickled onion slices.
6. Pour half the pickling brine onto the skillet to deglaze, then drizzle over platter and serve.