Showing posts with label dessert. Show all posts

Monday, August 31, 2015

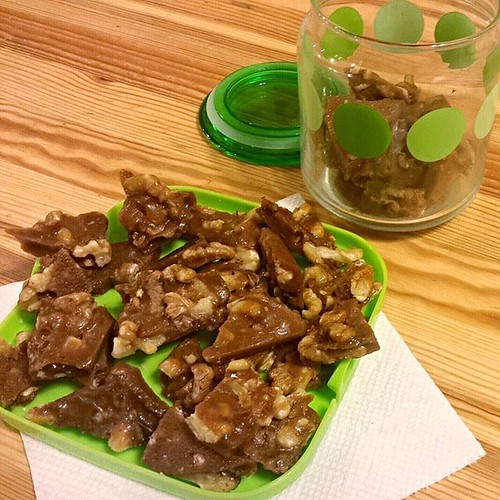
Recipe: Maple Nut Toffee

I don't fancy myself as much of a confectioner, considering how anxious I get over exact measurements and a big role of candymaking is boiling the syrup the right temperature.
Maple Nut Toffee / Brittle
So I was rather surprised at how this easy and delicious maple nut toffee turned out, since the recipe is fairly forgiving. Instead of a thermometer (which I don't have), I used the cold water candy test. And it's a lot less stressful than one (including myself) imagine. Just plunge a small spoon's worth of syrup into cold water and use your hand to see what stage the resulting candy is.

Maple Nut Toffee / Brittle
(adapted from California Walnuts' website)
about 50-60 bite-sized pieces

Ingredients:
2 cups of raw, unsalted nuts, roughly chopped (I prefer walnuts, pecans or cashews since their softer crunch is a nice contrast against the snap of the toffee)
1/2 cup granulated white sugar
1/2 cup light brown sugar
1/4 cup grade B maple syrup*
1 cup (2 sticks) of unsalted butter, cut into smallish pieces (for faster melting)
2 teaspoons vanilla extract
1/4 cup water
extra cold water for candy testing

*the grades of maple syrup is not about quality, but whether its color (& by association, "mapliness") — for cooking I prefer Grade B since it allows that distinctive busky, woodsy flavor to shine through.

Directions:
1. In a non-stick pan over medium-high heat, heat the chopped nuts, stirring/tossing regularly. Once it starts getting toasty (you'll start smelling the nutty aromas, and the nuts will start to char around the edges), turn off heat and set aside.
2. In a stainless steel pan, combine all the other ingredients and bring to low, gentle boil over medium-high heat, stirring as needed to melt the butter and mix everything together into a syrup.
3. Once the mixture starts to boil, lower heat as needed to bring it to a simmer and allow it to heat for another 15-20 minutes. Do not stir during this time.
4. When the candy color is a medium brown, do a cold water candy test. When it hits the hard crack stage (or when it hits 300 degrees Fahrenheit — if you have a cooking thermometer), turn the heat off and remove the pan from the burner. (Per the linked page, be careful when working with the hot candy syrup)
5. Add the toasted nuts into the syrup and stir to evenly incorporate the two.
6. Pour the mixture into a baking pan (I used a 8"x12") and spread evenly to cover all edges & corners. You can use a larger pan for a thinner layer candy, making it more of a brittle than a toffee.
7. Set and allow to cool for a few hours (or overnight) at room temperature.
8. Break the sheet of toffee into bite-sized pieces to store and enjoy!

Monday, March 31, 2014

Recipe: Express Tiramisu

Back in the mid-late 90s, tiramisu was the "it" dessert. And thus, it was something I consistently order every time I see it on the menu, all the while feeling very sophisticated about the layers of cake & custard, with a hit of coffee and sometimes a splash of booze.

And even though this dessert has already seen its heyday, it's still something I whip up regularly for gatherings. Just saying that you're bringing tiramisu to a party lends a whole sense of "Ooo la la," even though it's impeccably easy to make. Moreso given the time- & effort-saving shortcuts I take, which means it's really a little prep work (namely, brewing then cooling down some coffee), half an hour for mixing & assembly and then a few hours' (or overnight) in the fridge before serving.

Express Tiramisu (serves 6-8)

Ingredients:

  • 18 ladyfinger cakes (readily available at Italian markets)
  • One 8 oz. package of cream cheese, softened
  • 4 oz. ricotta cheese
  • 4 oz. heavy whipping cream
  • 1 cup granulated sugar, divided in half
  • 1 tablespoon vanilla extract
  • 1.5 cup espresso or strongly-brewed coffee, cooled to room temperature
  • 2 oz. simple syrup (1:1 sugar-water mix)
  • 3 oz. Amaretto, or your liqueur of choice (optional)
  • Chocolate shavings for garnish (I used a vegetable peeler on a bar of dark chocolate)
Directions:
  1. In a shallow pan or dish, combine coffee, simple syrup and Amaretto, set aside.
  2. In a separate bowl, combine cream cheese, ricotta cheese, half cup of sugar and vanilla extract; mix until smooth
  3. By hand or machine, whisk together half cup of sugar with the heavy whipping cream until it has soft-to-medium peaks. Then gently fold into the cream & ricotta cheese mixture.
  4. Dip ladyfingers, one at a time, into the coffee mixture - gently rolling both sides until they start to soften, then place in a 8" x 8" dish or pan. Repeat until you have one layer of coffee-soaked ladyfingers in the dish (feel free to break apart the cakes as needed to fill any big gaps or holes.)
  5. Use a spatula or wooden spoon to spread a thin layer of the cheese mixture until the ladyfingers are no longer visible.
  6. Repeat with another layer of soaked ladyfingers & cheese mixture. 
  7. Top with chocolate shavings, cover with plastic wrap and chill in fridge for at least 3 hours (or overnight). Serve chilled.

Friday, December 13, 2013

Recipe: Lemon-Raspberry Sour Cream Cake

For me, chilly winter weather (OK, as chilly as Southern California gets) means time to fire up the oven so I can flood my home with that wondrous freshly-baked aromas & a blast of comforting warmth.

All this was made even better when I entered Hodgson Mill's "Have a Grain Holiday" recipe contest, since I get to be creative in crafting a recipe and get a batch of their lovely baking products too. (Actually, you can get a chance at their baked goods too by entering their sweepstakes, and if you missed out on that - here's a $1 off coupon for you to use through the end of Feb.)

And for my blog readers, here's an extra giveaway opportunity for their baking products.

Lemon-Raspberry Sour Cream Cake And while I know winter usually call for baked goods that are hearty, robust and spicy (fruitcakes, gingerbreads and the like,) I think it's a refreshing change of pace to have some bright and sunny too -- thus my lemon-raspberry sour cream cake. It's light in texture, tender in mouthfeel with the mildest crunch from a sugar topping, and the perfect fruity tang to balance its sweetness.

Slices of this cake can pass off as a breakfast pastry. Or if you're feeling more indulgent, top it with a fruity dessert sauce, light frosting or scoop of sorbet for a simple yet elegant dessert dish.

Lemon-Raspberry Sour Cream Cake

Ingredients
  • 1 cup flour (I used Hodgson Mill's White Whole Wheat Flour)
  • 1 teaspoon baking powder
  • 1/2 teaspoon baking soda
  • 1/4 teaspoon salt
  • 1 stick unsalted butter, softened
  • 3/4 cup granulated sugar
  • zest of 2 lemons (approx. 2 tablespoons)
  • 1 egg, beaten
  • 1 teaspoon vanilla extract
  • 1/2 cup sour cream
  • 1 cup frozen raspberries
  • 1 tablespoon raw/turbinado sugar
  1. Preheat oven to 425 F and line the bottom of a 9 inch cake pan with parchment paper.
  2. In a bowl, whisk together flour, baking powder, baking soda and salt. Set aside.
  3. In a larger mixing bowl, toss the granulated sugar and lemon zest together; add butter then cream until smooth. (You can also use the butter paper to grease the sides of the cake tin.)
  4. Add sour cream, vanilla and egg and combine until smooth. Then add flour mixture in 2-4 batches, stirring until well-combined each time.
  5. Gently add the frozen raspberries and stir until they are well distributed throughout the batter.
  6. Pour batter into the cake pan and smooth out with a spatula or clean hands until it's even throughout (the batter is on the thicker side.)
  7. Sprinkle the turbinado sugar on top and put in oven's middle rack.
  8. Bake for 30 minutes, testing for doneness as needed (a toothpick inserted in center of cake should come out clean.)
  9. Let cool for 10-15 minutes, then serve. 
Disclosure: Hodgson Mill had provided the flour used in this recipe.

Thursday, July 18, 2013

Finally made it to Lone Pine's Alabama Hills Cafe

Alabama Hills Cafe Mural
For three consecutive return trips from snowboarding weekends at Mammoth, I've missed this pitstop on the way back. Who knew it would take me doing a summer hike at Mt. Whitney to actually make a visit here (twice!)

The menu is straightforward and void of the frou-frou you'd see in the "diners" of LA (good luck asking for quinoa or kale,) but the fare is solid and the portions are lumberjack-sized, and we can't imagine a better way to carbo load and recover before and after our mountainous trek.

Post Hike Breakfast
For lunch the day before the hike, I ordered their special of the day cheesesteak (on their housemade jalapeno-cheese bread) and for our brunch before taking off, I followed FoodGPS' lead and got the chicken fried steak (FYI, if you're ordering breakfasty dishes here, for an extra buck you can swap your toast for biscuit & gravy -- totally worth the price & caloric guilt!)

As tasty as they both were, I finished neither, and for good reason...
Tripleberry Pie
... their triple berry pie a la mode, which had perfect proportion of flaky crust and filling that's not-too-sweet, bursting with ripe tanginess & just goopy enough for a little pie porn. Warmed up with a scoop of ice cream and you got a little slice of heaven right there.

I already can't wait for another excuse to make a re-visit, even if it means racing down the 395 to make it in before their 2 p.m. closing time.

Alabama Hills Cafe
111 W Post St
Lone Pine, CA 93545
(760) 876-4675

Wednesday, July 10, 2013

Desserting it up @ Patisserie Chantilly

One of my must-stops whenever I'm in the Torrance area is Patisserie Chantilly. My own words can't really do their desserts justice, so I'll let you salivate over the photos instead . . .
Chantilly Sweets
Chantilly Desserts

Simply put, being a Japanese-French bakery, what Chantilly does really well are mousse-y desserts that are light as clouds but vibrant in flavors. My particular favorites include the Mousse Au Mango topped with coconut milk, tapioca and mango chunks, and the Othello - a heavenly combination of chocolate mousse & cake layered with sesame paste.

Also noteworthy is their freshly filled choux puffs that puts Beard Papa's to shame. The sesame one is especially good, but sadly, just ran out on my last excursion there.

So in short: go, enjoy and get some to-go edible souvenirs too. You won't regret it!

Patisserie Chantilly
2383 Lomita Blvd #104
Lomita, CA 90717
(310) 257-9454
Facebook